
There are many ways to drive traffic to your website, but Search Engine Optimization (SEO) is one of the most effective. SEO is a collection of strategies and techniques targeted to help your pages rank higher in search engines results. This raises your website’s visibility and can help it really take off.
Fortunately, WordPress is quite SEO friendly platform in comparison to other closed source content management systems, such as Joomla, Drupal, Shopify, etc. This is precisely why a lot of people choose WordPress to start a blog or website.
While WordPress makes sure that the code it generates follows the SEO guidelines, there is a lot more you need to do if you would like to maximize your SEO efforts.
Thus this ultimate WordPress SEO guide will provide you with a step-by-step actionable process to properly improve SEO. I will give out WordPress SEO best practices which are proven to boost your website traffic drastically.
Why WordPress is Good for SEO?
WordPress at its core is solidly designed and developed due to the large and active open source community that is continually updating WordPress. WordPress enables you to do many simple and powerful SEO tasks right on the dashboard. In fact, you might optimize several aspects of SEO without even knowing it! If a best practice is not in WordPress, there is a good chance it will be integrated into a future version.
Also since WordPress is so widely used, there is tons of great content supporting it to help you figure out 99% of things you want to do. WordPress has a great balance in ease of use and robustness. So it’s good for beginners and advanced levels both.
One more benefit comes from the extensive WordPress plugins ecosystem. This really is another example of the active open source WordPress community adding substantial value. Many great plugins are free and easily available from the wordpress.org directory or in the dashboard. Additionally, there are several exceptional paid SEO tools, the majority of which work seamlessly with WordPress. The most popular SEO plugin is Yoast SEO, which will cover in detail later. If for whatever reason you don’t like Yoast SEO, there is a similar plugin called All in One SEO Pack that will do the majority of things.
3 Main Google Ranking Factors
This is one core concept to comprehend from the start. While Google’s algorithm has 200+ ranking factors, it actually comes down to 3 things. These are:

On-page SEO is essentially your content and presentation. Technical SEO is the foundation of all things.
OK, you’ve got a little understanding of the fundamentals of SEO, so now let’s find out exactly how WordPress makes it simple to get your SEO technique up and running!
Affiliate Disclosure: This article contains affiliate links, which means Affapress earns a small commission whenever you end up purchasing products we recommend. However, the opinions written are only based on our experience and not how much they pay. Please continue to support our work and learn more about our affiliate links policy.
WordPress SEO Basics
SEO can get technical, but it not necessarily so. Just learning a few basic SEO tips to optimize your website can provide you with a noticeable increase in your website traffic.
So let’s start with the basics settings.
Check Your Website Visibility Settings
Let’s start with visibility. In case you want people to find your website (of course you do), then you’ll need to make it easy for search engines to find.
WordPress comes with a built-in option which allows you to hide your website from search engines. The purpose of this option is to provide you with time to work on your website before it’s ready to go public.
By default, these settings should be fine, but if the checkbox below gets checked, it could stop your SEO before you start:

To fix this problem simply log in to the admin area of your WordPress site and navigate to “Settings > Reading” page.
You need to scroll down to the ‘Search Engine Visibility’ section and make certain that the box alongside to ‘Discourage search engines from indexing this site’ is unchecked.
Don’t forget to click on the “Save Changes” button to save your changes.
WWW vs Non-WWW
When you initially start your website, you’ll need to choose whether you want to use www (http://www.yourdomain.com) or non-www (http://yourdomain.com) in your website’s URL. In short, you can have it or not, but you need to pick one and stay with it.
The reason for this is that search engines will see the distinction as two different websites. Once you’ve selected your format, make sure it’s set correctly in your WordPress settings under the “Settings > General” page. Add your URL in both the ‘WordPress Address’ and ‘Site Address’ fields.
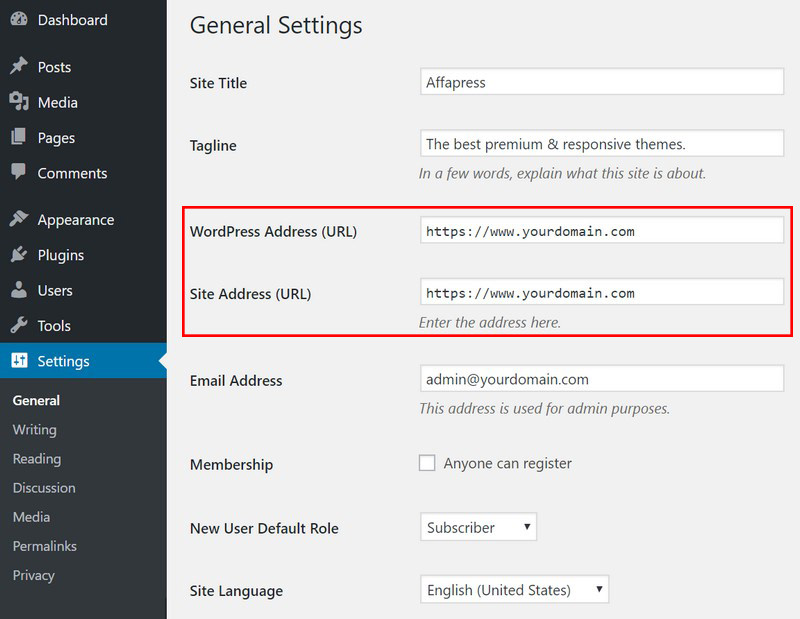
Despite what someone else might say, from an SEO perspective there’s no advantage to using one or another.
Use SEO-Friendly URLs
SEO friendly URLs contain words that plainly describe the content of the page, and they’re easy to read by both humans and search engines.
Google gives more weight to the very first 3-5 words in your URL. As an example, the URL of this article is “improve-wordpress-seo”. For best results use your target keyword at the beginning of the URL and even start with it if at all possible.
Simply by using SEO friendly permalink structure increases your chances of getting better positions in search results.
Below are three examples of URL structure, which do you think is optimized for SEO?
Option 1: http://yourdomain.com/?p=1234
Option 2: http://yourdomain.com/2018/09/improve-wordpress-seo/
Option 3: http://yourdomain.com/improve-wordpress-seo/
The issue with option 1 is the default permalink is the numeric ID of your post or page. This is not descriptive for search engines, is not clear for your users includes no keywords, and is unsightly.
Option 2 is better but not optimized since the month and year are diluted the impact of the relevant keywords. Actually only consider including dates in the URLs if you are providing news or other time-sensitive content.
And option 3 is the most optimized and SEO friendly URL structure that is simple to read by both humans and search engines.
Luckily you can change it easily. Navigate to “Settings > Permalinks” and simply change your permalinks to ‘Post name’ and then hit “Save Changes” button to store your settings.

You should do this soon after you start your WordPress site. If you wait until you’ve already begun publishing posts, and then change your structure, it can mess up the structure of your whole website. You will lose all of your social media share numbers and run the risk of losing your existing SEO rankings.
In case you must change the permalinks down the road, you must properly redirect all original URLs to the new URL. That way your incoming backlinks that are very important for SEO will still work.
Setting up all these redirects (called 301 redirects) is important and can be difficult. You might want to talk to a professional if you aren’t comfortable doing technical tasks yourself.
back to menu ↑
WordPress SEO with Plugins
With regards to WordPress, there’s a plugin for everything. Here I actually look at the best options for your SEO and some housecleaning to get everything set up.
Optimize Your Website Using Yoast SEO
Rather than installing a bunch of plugins for various tasks, you can accomplish everything along with one free installation of Yoast SEO. Simply having it around allows you to take benefit from some awesome features, including but not restricted to:
- Individual page scores that show how optimized your content is across various factors.
- Custom title tags and meta descriptions on your pages.
- Readability scales in order to show how clear and concise your writing is for readers.
It’s actually something special and suggested by simply about every website owner out there. Grab this one and never look back. It’s one of the best SEO tools for WordPress.
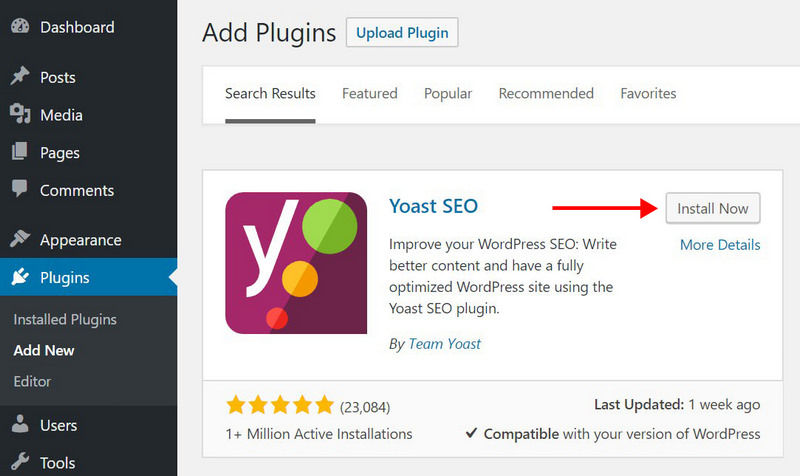
Installing Yoast SEO Plugin
To install the plugin, go to “Plugins > Add New”, search for Yoast SEO and then install it.
Configuring Yoast SEO Plugin
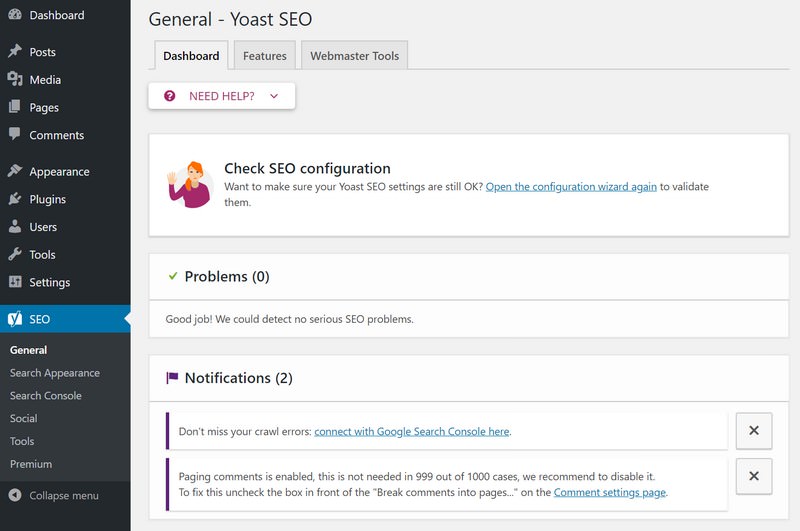
Start off the configuration by going to the “SEO > General” page. This page will basically provide you with an overview and an alert if there are any kind of problems.
Right now activate the essential features you want to use on “SEO > General > Features”.
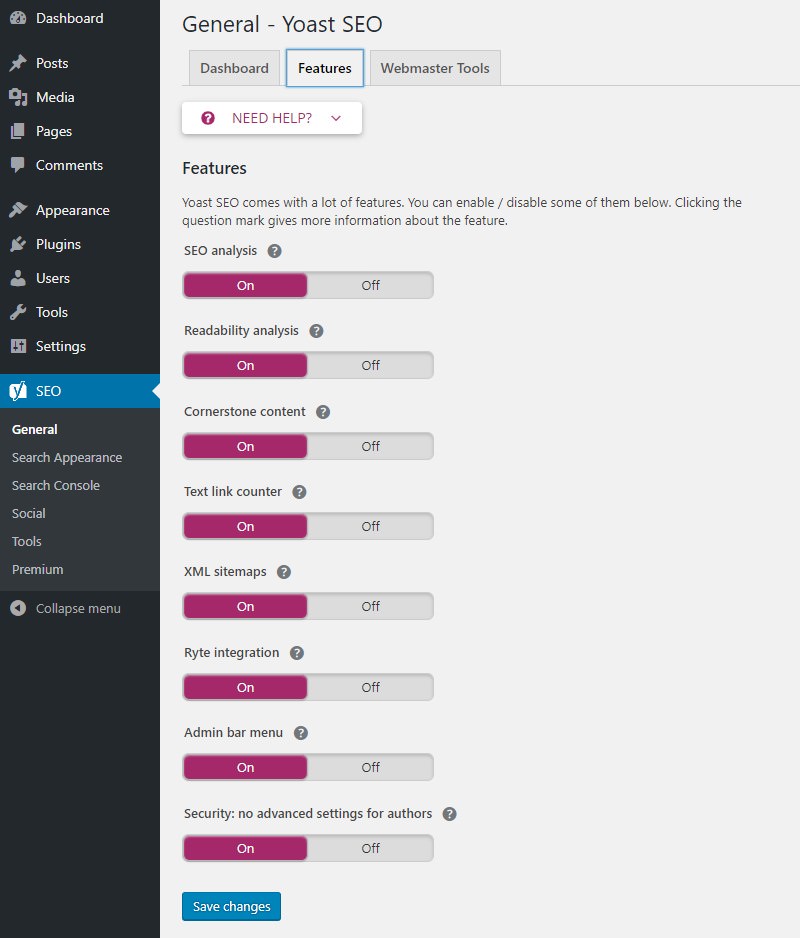
You will be able to see several advanced settings pages appear. Below are outlined the most essential settings you need to consider configuring:
- Your Info – This section tells search engines whether or not your website is personal or represents a business. In case you select a person, you will have to enter your full name. Or if you select a company, you’ll have to enter your business name and logo.
- Webmaster Tools – Here you need to enter authorization codes so that Yoast SEO can access and verify your Google Search Console, Bing or Yandex accounts.
- Titles & Metas > General – Here you can configure options such as whether or not you allow Yoast SEO to edit your titles. In most cases, it’s better to turn this on. You can also configure on your page, separator (something that separates your page name and site name in the title bar). Readability analysis and keyword analysis can be configured here.
- Titles & Metas > Homepage – Here you are required to enter the title and description of your website’s homepage. If you’ve set a custom homepage, you need to edit the title and description from that page itself.
- Titles & Metas > Post types – Here you need to configure how your post titles will appear in search results. It is suggested in order to leave Title template of the post, pages to %%title%% and description fields empty, so that, if you’ll want, you could add the description while writing. Also, you should make sure that none of them are set to noindex. When your posts/pages are set to noindex, they won’t be crawled by Google.
- Titles & Metas > Taxonomies – Your Taxonomies are Categories and Tags. Unless you feel really need to show them in search results, it would be better to set them to noindex.
- Titles & Metas > Author Archives – If you possess a multi-author website, you should enable the author archives so that users could check posts of the specific author. If your website has only one author, it is much better to turn this off. Upon the same page, you can also configure your time-based archives.
- SEO > Social – Here you have to add your social media channels. This helps later on and boosts your chances of getting picked up in the Knowledge Graph.
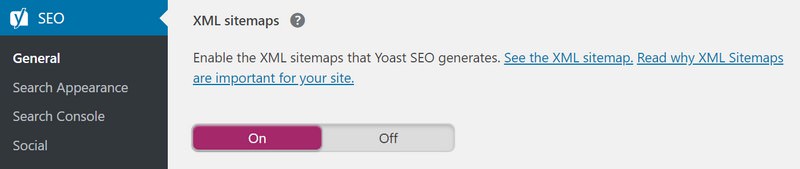
Adding XML Sitemaps to Your Website
An XML sitemap is a special kind of file that shows every page of your website. It’s used by search engines to find everything on your website. Getting one of these doesn’t inherently boost your ranking, but it makes it easy for search engines to find you using XML sitemaps.
In case you’re using the Yoast SEO plugin, then it will automatically create an XML sitemap for your website.
In order to find your sitemap, just go to this URL (don’t forget to replace yourdomain.com with your own domain name):
http://yourdomain.com/sitemap_index.xml
You can also use Google XML Sitemaps plugin to create a sitemap. As soon as you have your sitemap set up, you can submit to Google via the Search Console.

This is a great way to get your website indexed, and it lets you know if there’s something wrong with your submission.
Set up Google Search Console
Google Search Console is a set of tools that enables you to see exactly how your website is viewed by search engines. You can access reports and data that will surely help you better understand your website’s place on the internet.
More importantly, these tools also let you know when something is preventing your website from getting viewed by search engine bots that crawl web pages to understand and rank them. It’s very smart to set this up early and refer to it as your developing your SEO efforts.
If you’re using Yoast SEO plugin you can go to “Search Console” section, it enables you to connect your WordPress site to Google Search Console tools.
You can add your website to Google Search Console and then verify it using Yoast SEO.

Just click “Get Google Authorization Code” button and you will be redirected to Search Console website where you will get an authorization code. Copy this code and enter it in the plugin settings to complete the particular verification.
Following the verification, you will be asked to choose a profile. You will certainly need to select your website from a drop-down menu.
Yoast SEO will now start fetching your Search Console data into WordPress. After that you will be able to see Desktop, Smartphone, Feature Phone tabs on your screen.

If you’re not using Yoast SEO, you can watch a video below that shows an alternative way:
I advise that you check your Search Console at least monthly for gathering insights and find out your website’s SEO progress.
back to menu ↑
WordPress SEO Best Practices
In case you follow the basics of WordPress SEO and use the best WordPress SEO plugin, you will already be ahead of most websites.
However if you would like even better results, then you need to follow the WordPress SEO best practices below.
These aren’t very technical and most won’t even need you to touch any code. But they will make a huge difference if you follow them.
Using a Focus Keyword
A focus keyword is the main search keyword you want to rank #1 in Google. For instance, my focus (or target) keyword for this post is “WordPress SEO”, I want to include that phrase strategically throughout the article. This makes it clear that’s what the article is about without being showy. It’s a balance.
Exactly what I absolutely don’t want to do is unnaturally stuff the article with my keyword. Keyword stuffing is inserting the focus keyword or phrase excessively throughout an article. It comes off like you are attempting to game the system and Google could penalize you.
Include your focus keyword in the title, URL, first 100 words/paragraph, and at least one sub-header (H2, H3, etc). Furthermore, sprinkle your target keyword throughout the text in a natural manner.
There is absolutely no hard or fast rule for how many times to include your keyword. This is keyword density, the number of times your keyword is in the article divided by the total number of words. Use your keyword sufficiently that it makes clear the article is about that topic but not too many seem to be forced.
Since there is no formula, use your best judgment. I use my focus keyword 10-15 times in a 2000-3000 word article personally but for some, which may be too much or too little.
Yoast’s SEO scoring (green/yellow/red) is based mainly on your focus keyword so this is important. To insert your focus keyword in the edit post (or page) screen, you can scroll down below the editor box to the “Yoast SEO box > Focus keyword” field.

One necessary thing to remember is that Yoast SEO will simply count a keyword for its scoring algorithm if it is a precise match. For example, if my title is “SEO for WordPress” and my focus keyword in Yoast SEO is “WordPress SEO” then Yoast would technically not count my focus keyword as being in the title. While Google is advanced enough essentially count both of these variations as the same thing, Yoast SEO is not. I actually would count these close variations in your keyword count even if Yoast SEO doesn’t yet.
By the way, it’s very smart to use different focus keyword variations throughout your article. It will eventually show up more natural which Google likes ınstead of repeating the same exact match keyword over and over. Plus it might help you expand the keywords you can rank for, potentially leading to good rankings for the variations too.
Optimize Post Title Tag
A title tag is actually one of the most crucial on-page SEO factors. For best results, start a title with your keyword or place it at the beginning. It must be between 50-60 characters.
This is the title displayed on Google and other search engines as well as the browser tab. Therefore make it enticing so when someone sees it in the SERP they might be more likely to click through.
You just fill this in the title field of the WordPress edit post or page screen:

In case you rank well, but few searchers click on your article in the Google results, it won’t help you (and you might not rank well for long).
Note: The recommended Yoast SEO setting is to add your website name to the end of each post title on Google. This will increase your brand awareness but cuts into space for the actual title.
Furthermore, modifiers can help you to rank for long tail versions of your focus keyword. Use modifiers like ‘2018’, ‘best’, ‘guide’, ‘review’ and so forth.
Title Generation Tools
There are many title generation tools that will help you to create click optimized titles:
- Hemingway Sharethrough – It will show how attractive your headline is.
- SEOPressor’s Title Generator – A free title generator which will generate enticing titles for your articles.
- Portent’s Content Idea Generator – One of the most useful in my opinion. It can help you to definitely make a headline just by entering a topic.
- Title Generator by BlogAbout – An outstanding tool which provides enhanced ideas.
- Title Generator by TweakYourBiz – You’ll get lots of ideas just by entering a topic.
Set Post Meta Description
A meta description is one of the greatest opportunities to get more clicks in Google search results and also to boost your rankings and traffic.
It’s shown in the snippets in Google SERPs (Search Engine Results Page). It’s the black text under the URL that you’ve read a million times which describes the text.
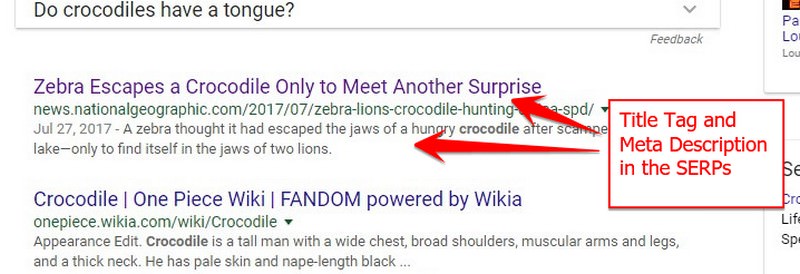
The meta description is a succinct description of the article which should have 135 to 160 characters. If longer, it gets cut off.
It also should contain your focus keyword inside it because Google bold the search term if they are found in the description.
The best place to add it is in the “Yoast SEO box” that is in the edit post or page screen:

How to make the meta description more appealing and get more clicks:
- Look at the Adwords paid ads. They are optimized for clicks. However, it is permissible to use ad copy only if it makes sense to your content.
- Study the results above you in the top 10 Google results. Look for words and phrases they have and you don’t. Pick words that sound like a good fit for your description.
- Use a certain number – people like content with particular numbers.
- Offer a fast solution – everyone is in a rush. When you provide a solution within a specific time frame you will get more clicks.
- What is it for me? Try to describe the benefits one will get in a clear way.
Note: When Google thinks another part of your article is a better description, they may override the meta description in the snippet and show what they feel is best instead. For example, if the user’s keyword is not included in the meta description, Google will likely display the part of the article that does include them in the SERP snippet.
Don’t Use Meta Keywords
Given that keywords are such an important part of SEO, you may believe that the keywords tag would also be very important to showing search engines what a page’s topic is.
That’s not true! Why?
Initially, meta keywords were one of the ranking factors in search engines, however, many sites abused them and now. Now meta keywords are essentially ignored if populated so it is better not to fill up them in whatsoever as to not appear spammy!
I think Yoast SEO puts it best:

Use Headers Properly
One good practice is utilizing headers tags correctly. By the way, headers mean the section titles that breaks text, not the header at the top of a document. I’ve heard both that this is not an SEO ranking factor. However, it is a good practice for consuming online content so why not make use of them?
Your title on the page must be an H1 header tag. The use of number 1 meaning the most important as it’s usually the largest, most protruding header. You only want one H1 to make it clear what is the key topic of the page. For sub-headers, you can use a blend of lower priority headers like H2, H3, and so forth.
You can easily set headers in the standard WordPress text editor. Your theme will arrange the style of the headers but you can change it out with a little bit of CSS, if you know it.

Headers help in a several ways:
- Headers provide clues on the topic. If a keyword is in a header it is likely an important concept to the article.
- Furthermore, headers a good way to structure the article. Since people scan instead of reading content online, headers keep them moving down the page while informing the main themes of the article and which sections are most relevant.
Image File Names & Alt-Text
When you’re naming your image files and uploading them, think about the topic of your post that they’re becoming put into. For example, rather than naming ‘pic1.jpg’, better name it ‘wordpress-seo-factors.jpg’. As usual, include keywords if natural.
Then when you’re uploading an image into WordPress, you’ll see the particular option to give it a ‘title’ and ‘alt-text’. The latter term is basically what search engines will see, so it should be a couple words describing the picture and exactly how it relates to your content. So, don’t ever forget the ‘alt-text’.
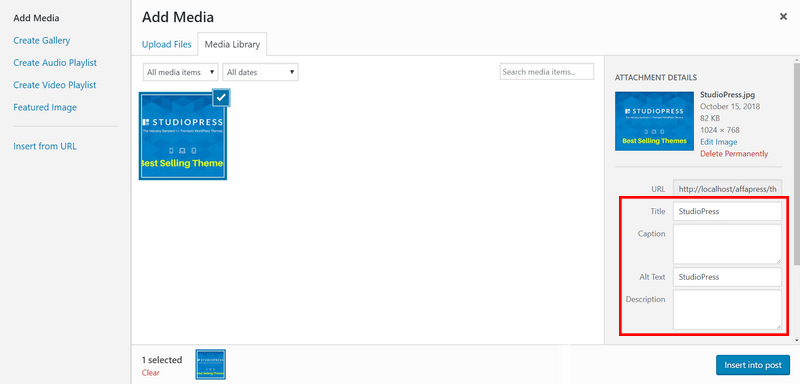
Image alt text was first created for accessibility purposes. When blind people can’t see images, their screen readers will still let them know what the image is using the image alt text. With regard to fully-sighted people, if the image doesn’t load the alt text will display using the broken image link.
Properly Using Categories & Tags
WordPress enables you to sort your posts into categories and tags. This makes it simple for you to manage your content by topics, plus for your users to be able to find the content they are looking for.
Categories and tags also contribute to helping search engines understand the structure and content of your website.

Often newbies get confused on how to best use categories and tags.
Categories intended for a broad grouping of your posts. In case your website was a book, then categories will be the table of content.
As an example, on a website, you could have categories like music, food, travel, and so on. Categories are hierarchical, so you could add child categories to them.
On the other hand, tags are more specific keywords that are useful to identify the contents of an individual post. For instance, a post filed under food category can have tags such as salad, breakfast, pancakes, etc. Think of these as indexes section within a textbook.
Simply by using categories and tags properly, you make it simple for your users to be able to browse your website. Since it’s easy for users, it also makes it simpler for search engines to browse your website.
Eliminate Thin/Duplicate Content
Duplicate content is when you have the same content on multiple pages of your website. And it is generally bad SEO practice for your website. Why?
If Google sees several different pages on your website that are similar it might not exactly know which one to rank highest. So, it might just choose one or even worse split the link juice between both. If you have two pages with similar content it could be hard for Google to find out which to rank higher so they may cannibalize each other’s rankings.
For example, WordPress creates archive pages for every tag, category, author, dates and many more. It’s really crazy, number of pages that are useless too many!
If you have all of these pages indexed by Google, there is certainly going to be a lot of duplicate content, which is detrimental to SEO.
How to prevent duplicate content:
- Post your article only in one category. When you post your article in several categories it will come up on more than one URL which will cause duplicate content. If you really must use several categories for one post use “rel=canonical” tag attribute.
- Disable or noindex WordPress archives that are automatically created by default.
- Set noindex to your Tags to avoid indexing on search engines.
Some taxonomies, tags and categories archives may be helpful but you might not exactly necessarily want those in Google. In cases like this, keep them enabled in Yoast SEO but noindex them.
The good part is this is very easy and simple in Yoast SEO. You only need to navigate to “Yoast SEO > Search Appearance > Taxonomies” page.

How to check if you curently have duplicate content?
Google Search Console and Siteliner are the most appropriate place to start.
There are two most effective ways to handle duplicate content:
- Delete the duplicate content.
- Add a canonical URL to each version. You can change Canonical URLs in Yoast SEO.
Why should you remove or set noindex to your thin pages? Due to the fact, they are often low-quality or out of date pages that nobody visits. You should remove them because they decrease your overall quality score.
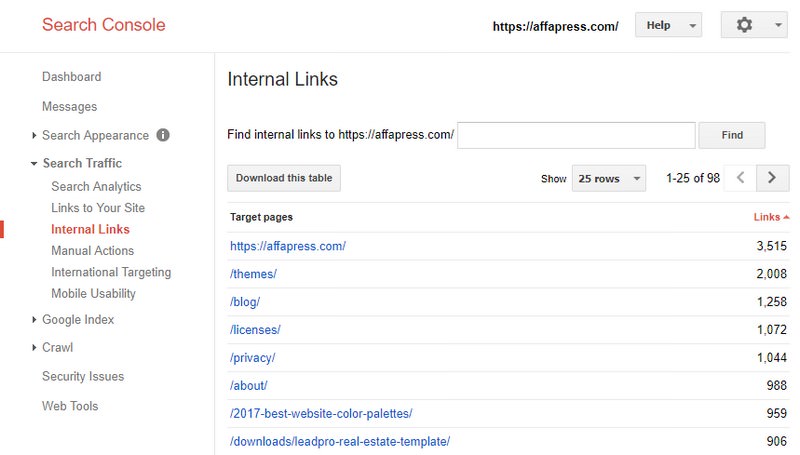
Make Internal Linking
Search engines set each page on your website a page authority score. The recipe of this score is kept a secret so that people are unable to game the results. Nevertheless, the most common indicators of authority are links.
This is why it’s important that you link to your content through your other posts and pages. This does a couple of things:
- Helps search engines find articles, especially older ones that may not yet be indexed.
- Increases reader engagement as they go through more of your content which drives up time on website and drives down bounce rate – both good for SEO.
- Provides you with a chance in order to set anchor text which needs to be managed to ensure a natural profile.
You can check the internal linking statistics in Search Console and recently in Yoast SEO Premium also.
What is anchor text?
Anchor text is the words on a link.
For instance, the anchor of the below sentence is “WordPress SEO Guide”:
“Here’s the link to the WordPress SEO Guide”
In case there it said “Click here for the WordPress SEO Guide” then “Click here” would be the anchor text. That is a poor choice because it signals no information to Google about the particular article topic.
So anchor text is another valid method for a signal to Google that URL is about.
The easiest way to get started with internal linking is using a related posts plugin such as Yuzo Related Posts, which adds that related stories under each post that you have read. But even better is linking within the article which you must do regularly.
NoFollow External Links
As stated above, links help search engines decide which pages are important. Once you link to a website, you are passing some of your website’s SEO score to that link. This SEO score is called link juice.
For good search rankings, you should make certain that you are obtaining more link juice through other websites than you give away.
Adding the “nofollow” attribute to external links (links to websites which you don’t own) instructs search engines not to follow those links. This helps you save link juice.
An external link generally looks like this in HTML:
<a href="http://yourdomain.com">Example Website</a>
An external link using the nofollow attribute will look like this:
<a href="http://yourdomain.com" rel="nofollow">Example Website</a>
You can add a nofollow checkbox to the insert link pop-up with Title and Nofollow plugin. This will definitely allow you to easily add nofollow attribute to external links.

Increase Dwell Time
The time visitors stay on your website is an extremely strong signal for Google about your website’s quality. That’s why you need to make only 10x content, which is truly relevant and up to date.
Multimedia will also help to keep people longer. Use relevant images, videos presentation, quizzes, sound versions of your content and so on.
To encourage discussion, ask your readers to leave comments at the end of each post.
Drive More Repeat Visitors
Repeat visitors are an indicator that you are a quality resource. Hook your readers to come again, create content in parts or mention at the end of every post what is coming next.
Do you gather email addresses on your website? If not, you lose a great chance to connect with your visitors. Provide them with a signup form to get free updates and send them an email when you publish a new article.

Keep Content Fresh & Updated
Search engines love fresh content and frequently gives it a ranking boost. You should revise your best articles over a period of several months and update them when they are out of date.
When visitors are looking for information they check when the article was released and they often skip on old content which usually is 6-12+ month old.
Mention when was the last time you updated and improved your article at the very top.
Otherwise, you could hide the publishing date.
Optimize WordPress Comments
Comments can be used as a strong indication of user engagement on your website. Engaged users mean more links back to your website, more traffic, and improved SEO.
However, you need to ensure that your comments are real and not spam. Spammers submit comments with bad links which could impact and even ruin your search rankings.
This is why I recommend everyone to get started on using Akismet. It is one of the two plugins that come pre-installed with every WordPress site, and it can help you combat comment spam.
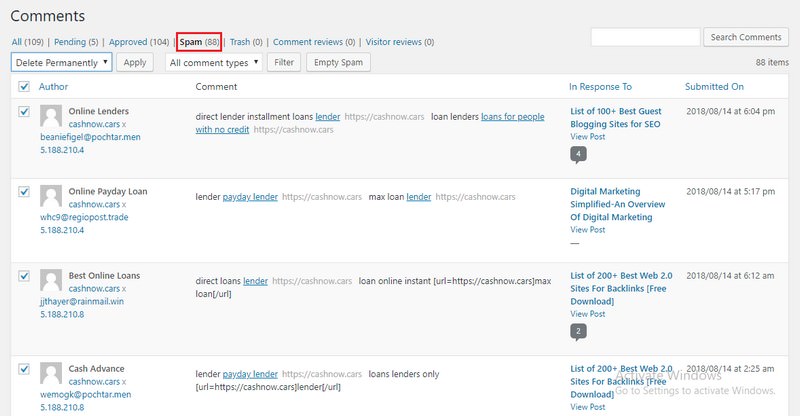
If your posts entice a lot of genuine, spam-free comments, then you should pat yourself on the shoulder for building such an engaging website!
However, too many comments on a post can make it load slower which also impacts your search engine rankings. (Keep reading till the end to discover more about how precisely speed impacts on SEO).
To get ready your website so that it can handle the burden your comments put on your server and speed, you can split comments into multiple pages.
Fortunately, WordPress arrives with a built-in solution to resolve the issue. You just need to navigate to “Settings > Discussion” and check the ‘Break comments into pages’ option.

Full Posts or Excerpts
WordPress displays and links to your posts from a number of pages such as home page, category archive, tags archive, date archive, author pages, etc.
By default, it shows the full article content on all these pages. This impacts your website’s SEO, as search engines may find it to be duplicate content. Full articles can also make your archive pages load more slowly.
Showing full articles everywhere also impacts your page views. For example, users who subscribe to your RSS feed will be able to read the full article in their feed reader without actually visiting your website.
The easiest way to solve this problem is by displaying summaries or excerpts rather than full articles.
You can do this easily, simply heading to the “Settings > Reading” page and then choose ‘For each article in a feed, show: Summary’ rather than ‘Full Text’.

Set up Breadcrumbs
Enabling breadcrumbs on your website is recommended. Firstly, they are internal links! Secondly, they also highlight site structure for both readers and search engines.
Breadcrumbs are very easy to add in Yoast SEO. You can do this simply by navigating to “Yoast SEO > Search Appearance > Breadcrumbs” section.

Note: It may add them to some posts and pages you don’t want them in. You can turn off categories but to get breadcrumbs off of individual pages you may have to use CSS to hide. I remove them from my landing pages because you want the least amount of interruptions and links on landing pages.
Add Social Sharing Buttons
Social shares are probably a minor ranking factor. Adding social shares buttons to increase shares on sites like Twitter, Facebook and Instagram probably won’t help your SEO directly nevertheless they help you to get more traffic that is correlated with higher Google rankings.
You might have thought that people would naturally share content they like, but guess what you are wrong! In fact, research by BrightEdge found that social sharing buttons can boost social sharing by 700%.
There are lots of social media sharing plugins out there but if you’re searching for a simple, lightweight try Simple Share Buttons plugin.
back to menu ↑
Speeding Up WordPress for SEO
The importance of speed to Google, and thus SEO, can’t be underestimated. It is important because it can provide a better user experience and help increase conversion among other important metrics. Besides being an ascertained ranking factor, slow sites will waste crawl budget minimizing the number of pages Google may index.
If you need to boosts your website’s speed, you should check out my best practices on this ultimate WordPress speed optimization guide.
Check Your Website Speed
Perhaps you ever pushed the Back button on your browser because a page took more than 3 seconds to load? In fact, more than 40% of people do that thing.
Thus there is no doubt that the website speed is critical for your SEO success.
Based on Alexa, fast-loading websites rank significantly higher than slow-loading websites. Keep in mind Google ranks pages, not websites but if your website is fast all of your pages have a better potential to rank for your target keywords.

There is a simple explanation.
If your website is slow and people abandon it this will certainly decrease the time they stay on site, bounce rate, average impressions per visit etc. And all of these are Google’s major ranking factors.
Let’s determine how fast is your website. You can use several tools below:
Google PageSpeed Insights – This tool grades your website score on the desktop and mobile devices.

Pingdom Tools – Speed Test, DNS Health and Traceroute (measure server response time). They provide real user monitoring services that I extremely recommend. They show your website’s loading times distribution in various locations.

GTmetrix – It grades your website’s performance and provides actionable suggestions on how to fix these problems.

Use Solid Web Hosting
Web hosting is the very basis of your WordPress site and is an essential component that ought to not be overlooked. Consequently using fast and reliable hosting is a must and no compromises here.
Choosing the right web hosting is important and you don’t have to base your choice on hosting prices. Typically, at low prices, you will get low performance, and this is what you want to avoid.
A good hosting choice will save you a lot of pain down the road and if a problem occurs, a good customer support should be able to help you out, so I would also need to remember to choose a host that offers good support. One of the quick trick you can use – ask them a question about pre-purchase, then monitor their reply time, attitude, and professionalism.
Although you may currently have a hosting, I suggest switching to a much better hosting provider because it will speed up your website’s loading time for up to several seconds. Obviously, this will have a positive impact on your website’s SEO.
From the many web hosting service providers, I personally use and suggest SiteGround for your WordPress site hosting.

Why You Should Choose SiteGround?
With regard to their commitment to uptime, speed, security, and support – it really is the superior web host right now! And I’m not the only one that ❤️ them.
Optimize Images for Website
Images are more engaging compared to text nevertheless they also take more time to load. If you are not careful about the size and quality of the image, then they actually cause a slowdown in your website.
Just before you upload images to your WordPress site, you need to ensure you use images which are optimized to load faster. See the following tips:
Choose The Right Image Format
The most popular image formats used on websites are JPEG and PNG. You can save a lot on the image file size, by choosing the right image format.
Now you might be wondering, what’s the distinction?
- PNG image format is uncompressed. When you compress an image, it loses some detail so an uncompressed image will have higher quality in more detail. The disadvantage lies in the larger file size, so it takes longer to load.
- JPEG, on the other hand, is a compressed file format that slightly lower image quality, but it’s significantly smaller in size.
So how do you determine which image format is right?
- If your image or photo has many different colors, then you better use JPEG.
- If it’s a simpler image or you need a transparent image, then you better use PNG.
The majority of the images which I use on this website are JPEGs.
Resize Your Images
Uploading large images that are not optimized, used in a small place on your website is a big NO. As an example, you have an image slot with a size not larger than 600 x 400 px on your website and you upload a 1920 x 1080 px image (or even bigger!). Now, you keep making this mistake repeatedly and your website will be very slow.
The first thing to do is resize the image to the right size. In this example, the image slot will never have a size larger than 600 x 400 px, so you have to resize the image to that size.
You are able to resize the images by using an image manipulation software such as GIMP or Photoshop. By applying this method will save resources and also makes you comply with Google Pagespeed’s guidelines.
Compress Your Images
Image compression is a process to compress the size of an image file without the need to affect its quality. I suggest TinyPNG, as it’s free and very simple to use.

If you’d prefer to download a tool with regard to offline image optimization, I really suggest that you get ImageOptim. This is another user-friendly, capable solution.

Using Content Delivery Network (CDN)
One proven way you can reduce the load time of your website is using a Content Delivery Network (CDN). A CDN store static and commonly-requested files like images, CSS and JavaScript on multiple servers across different geographic locations. When visitors come to your website the CDN service will load the files on the page they open from the nearest server to their physical location.
As an example, you host your website in the United States. Then there is a visitor from the United Kingdom visiting your website. Your CDN provider has a server in Germany.
It will load your website’s files through the German server for that visitor, not from the U.S. This outcomes in lower reply time that will speed up your website and will certainly improve the user experience.
Another great thing about CDN is that it will save your server bandwidth plus has a faster speed than average WordPress servers.
One of the best CDN services which I suggest is KeyCDN. They offer a convincing content delivery services through a pay as you go program. To facilitate setting up a CDN for your WordPress site, KeyCDN created a new lightweight plugin called CDN Enabler. Now its available for free and setup can be completed within minutes.
Choose a Fast WordPress Theme
Not every WordPress themes are the same when it comes to speed. Your theme should be fast loading, mobile friendly, keep updated, compatible with the latest WordPress version.
Good themes providers usually point out this on their sales page. If there is no information or perhaps you are picking a free theme, you can find out how fast it really is with the speed test tools mentioned earlier.
Never install pirated themes on your website. 99% of the time they have concealed links in the footer, malware or a backdoor code which could get your website hacked.
When you are picking a free theme always conduct a research about it and check if it is listed in WordPress theme directory.
I personally recommend you to choose a theme from StudioPress. All their themes come with clean, lightweight code that makes your website fast and also have mobile responsive, secure framework, and run smoothly.

Why You Should Choose StudioPress?
They’ve earned the trust by over 210,000 WordPress users including Yoast, Matt Cutts from Google and Matt Mullenweg the founder of WordPress.
Install a Caching Plugin
A caching plugin is another great way to reduce page load and making your website faster. Basically, it will cache store certain files in the browser that don’t change much like images. When a user re-visits your website in a specific period of time, it will serve them the saved cache files as an alternative to downloading the whole file again.
The most popular free caching plugin is W3 Total Cache which will make your WordPress site anywhere from 2x to 5x faster.
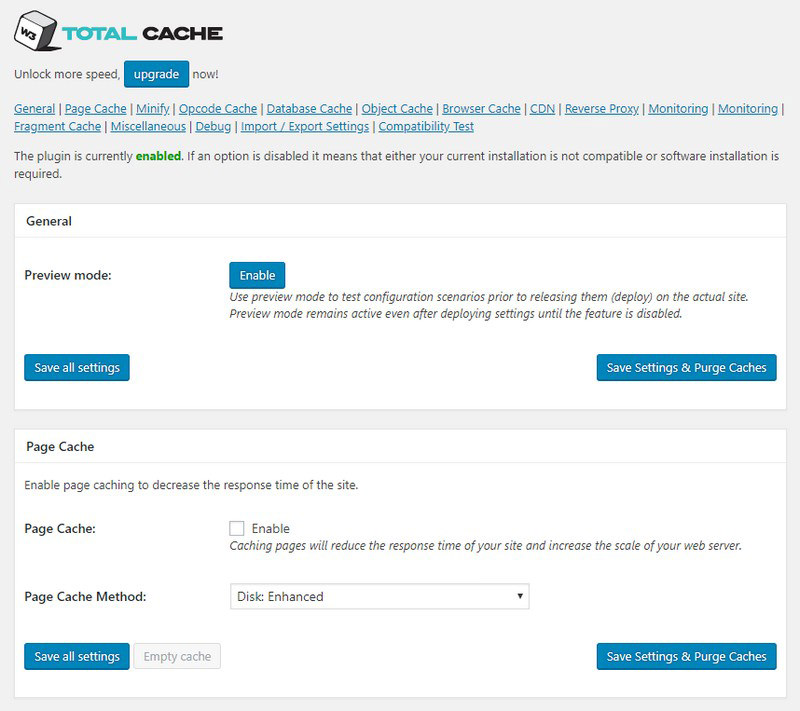
W3 Total Cache works to improve your website’s user experience by caching every aspect of your website, enhancing your server performance, decreasing the download times and offering transparent content delivery network (CDN) integration.
This plugin allows you to perform the following:
- Change the order that your plugins are loaded.
- Selectively disable plugins with any post type or WordPress managed URL.
- Adds grouping towards the plugin admin age.
But if you have more budget I strongly recommend using WP Rocket which offers far more robust functionality.
Compress & Minify Code Files
Gzip compression provided the single most substantial improvement to my website speed. Gzip is an application that compresses HTML, CSS and JavaScript files on your server in order to reduce their size. It works like zip folders on regular computers.
Gzip’s algorithm is able to reduce the size of HTML, CSS, and JavaScript files by 70 to 90%. How could this happen?
It works by removing unnecessary characters and formatting such as spaces, line breaks, comments without affecting code functionality.
You might be able to do this manually but it will be a little risky since you need to modify the sensitive .htaccess file.
A safer alternative is by using a plugin. And in fact the caching plugins I mentioned before have this as a setting. It’s as simple as checking a box!

If you ran your website through the Google PageSpeed Insights tool, you could possibly have gotten the particular recommendation to minify JavaScript, CSS and/or HTML files. This means your website (themes, plugins, etc) is pulling in these different files plus code from different places. Minifying the code consolidates into one file (or less files) to speed up the loading of your website.
To minify code, I suggest employing a plugin called Autoptimize which led to a considerable enhancement in my website.

back to menu ↑
WordPress Security for SEO
If a site is blacklisted, it doesn’t show up in any search engine results at all. This means that the security of your WordPress site is crucial for good rankings. You don’t want all your hard work on SEO to go to waste if your website is compromised by a hacker.
The good news is that it’s not hard to keep your WordPress site safe. See the step-by-step instructions on my ultimate WordPress security guide.
Start Using SSL/HTTPS
SSL (Secure Sockets Layer) is a technology that is capable of encrypting the connection between a user’s browser and the server where they are connected. This adds an extra security layer to your WordPress site.
Websites secured with SSL are marked with a padlock sign in the browser’s address bar. This can make your website more trustworthy, and the fact it is required if you are running an online store with WordPress and processing delicate payment information.
With SiteGround, you will get a free SSL certificate installation (which normally costs $60) from ‘Let’s Encrypt SSL’ and just takes a couple of minutes to be able to install it perfectly (which normally requires several hours).
Keep Your WordPress Updated
WordPress is an open source platform which is frequently maintained and updated. These updates are important for the security and stability of your WordPress site.
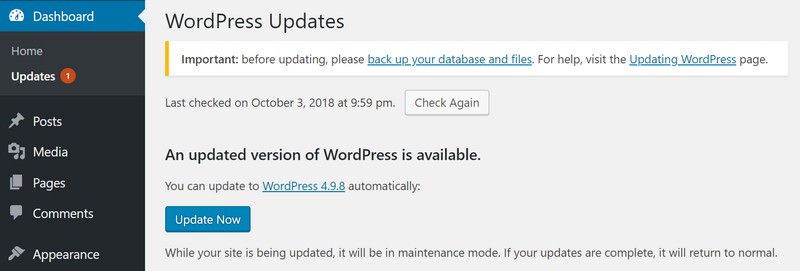
As a site owner, it’s your responsibility to keep your WordPress core, themes, and plugins are up to date. Not doing this might result in your website being slow and unreliable, and causing you too vulnerable to security threats.
Install a Security Plugin
One powerful way to tighten the security of your WordPress site is to set up an auditing and monitoring system that will keep track of everything that happens on your website.
Fortunately, this can end up being all taken care by the best free WordPress security plugin, Sucuri Security which is a super-sophisticated security suite designed to complement your existing security posture.
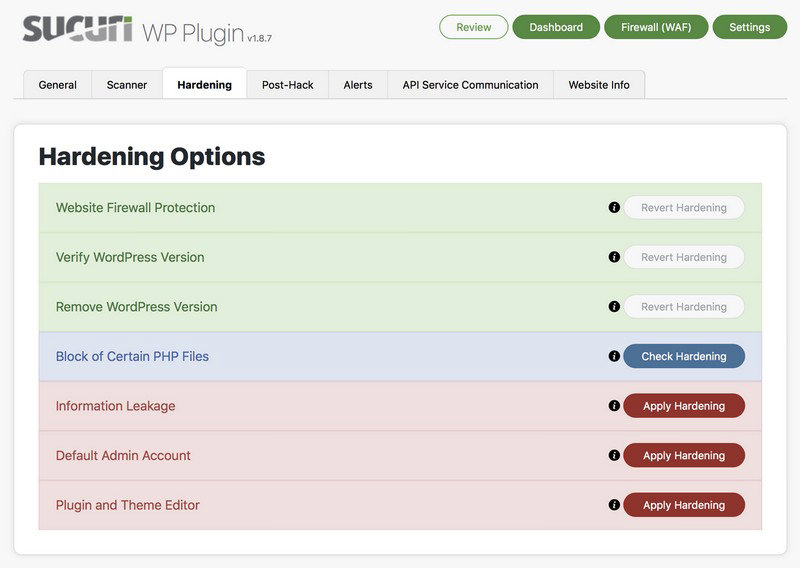
Sucuri provides you with a set of security features for your WordPress site, each created to have a positive effect on your security posture:
- Security Activity Auditing
- File Integrity Monitoring
- Remote Malware Scanning
- Blacklist Monitoring
- Effective Security Hardening
- Post-Hack Security Actions
- Security Notifications
- Website Firewall (premium)
back to menu ↑
Final Thoughts
SEO is an ongoing process that is always transforming and never truly finishes. I hope this article could help you learn how to optimize your WordPress site for SEO aright. Go ahead and apply some of these WordPress SEO tips, and you will see an increase in your traffic within a few months as the search engines process your changes.
Now it’s your turn to share. What steps would you recommend for WordPress site owners? Let me know in the comments below!

- Readers Rating
- Rated 4.9 stars
4.9 / 5 ( Reviewers) - Spectacular
- Your Rating