
Having your website hacked can be anything from a minor headache for a casual blogger, to a significant security lapse for a well-established business. If you’re dealing with any type of private or sensitive information on behalf of customers, a security breach can potentially be damaging to both you as well as your customers.
Since WordPress is the most popular CMS on the internet and is currently powering tens of millions of all websites. It retains such a large piece of the market share, it brings additional security concerns and raises your threat of attack when vulnerabilities are discovered.
Although WordPress has basic defense features set up, you are unable to rely on these alone to secure your WordPress site from hack attempts. Therefore, today I will be sharing a lot of tips, strategies, and techniques you can use to harden your WordPress security and assist in preventing yourself from being hacked or becoming the next victim of another brute-force attack.
Affiliate Disclosure: This article contains affiliate links, which means Affapress earns a small commission whenever you end up purchasing products we recommend. However, the opinions written are only based on our experience and not how much they pay. Please continue to support our work and learn more about our affiliate links policy.
WordPress Vulnerabilities
Perhaps you’ve ever searched on Google and seen a warning that one of the websites on the search list might contain malware, or might it have been hacked? What steps will you do next?
Most users avoid these websites like the plague, no one wants to be exposed to malware. This alone will lead to a lot of traffic loss.
However, your most serious traffic loss will likely to come from being removed from Google search results. In a recent poll, 45% of people who noticed their website had been hacked saw a drop in search traffic. And 9% said they saw a significant decrease in traffic which was as much as 75%. Those are frightening numbers.
Today, WordPress security becomes even more important due to the fact WordPress gets a bad rap sometimes for being susceptible to security vulnerabilities plus inherently not being a safe platform to use for a business. Nevertheless, this is almost always because of the fact that users keep following industry-proven security worst-practices. Using an outdated version of WordPress software, poor system administration, credentials management, and lack of needed website and security knowledge among non-techie WordPress users keep hackers on top of their cyber-crime game.
Now, this is not the time to say that vulnerabilities don’t exist. Based on a Q3 2017 research by Sucuri, a multi-platform security company, WordPress still continues to lead the number of infected websites they worked on (at 83%), this is up from the previous 74% in 2016.

WordPress is currently the most popular website platform that powers more than 32% of all websites on the internet (in 2018), and with thousands of theme and plugin combinations out there, it’s not surprising that vulnerabilities exist and are continually being discovered. However, there are also large communities around the WordPress platform, to make sure these things can be patched ASAP. The WordPress security team consists of approximately 25 experts including lead developers and security researchers – about half of them are employees of Automattic and a number work in the web security field.
Check out several of the different types of WordPress security vulnerabilities listed below:
Backdoors
The aptly named backdoor vulnerability provides hackers with hidden passages bypassing security encryption to get access to your WordPress site through irregular methods such as wp-admin, SFTP, FTP, and so forth. Once exploited, backdoors allow hackers to wreak havoc on web hosting servers with cross-site contamination attacks – damaging multiple websites hosted on the same server.
Backdoors in many cases are encrypted to appear like legitimate WordPress system files, and make their way through to WordPress databases by exploiting vulnerabilities and bugs in outdated platform versions.
Pharma Hacks
The Pharma Hack exploits are utilized to insert malicious code in outdated versions of WordPress sites and plugins, causing search engines to return ads for pharmaceutical products when a compromised website searched for. The vulnerability is more of a spam threat than traditional malware but gives search engines enough reason to block the website on allegations of distributing spam.
Brute-Force Login Attempts
Brute-force login attempts utilize automatic scripts to exploit weak passwords and obtain access to your WordPress site. Based on study states that hackers can easily compromise as many as 30,000 websites in one day using only brute-force attacks.
Malicious Redirects
Malicious redirects create backdoors on your WordPress installation by using FTP, SFTP, wp-admin, and other protocols and inject redirection codes into the website. The redirects are frequently put in your .htaccess file and other WordPress core files in encoded forms, directing the web traffic to malicious websites.
Denial of Service (DoS)
Probably the most dangerous of them all, Denial of Service (DoS) vulnerability will exploit errors and bugs in the code to flood the memory of website operating systems. Hackers have infiltrated millions of websites plus reap millions of dollars by exploiting outdated and buggy versions of WordPress software with DoS attacks. Although financially motivated cybercriminals tend not to target small companies, they likely to compromise outdated vulnerable websites in creating botnet chains to attack big businesses.
back to menu ↑
Protecting The Login Page
Everybody knows the standard of WordPress login page URL. The backend of the website can be accessed from there, and that’s the main reason why people attempt to brute force their way in. Simply by adding /wp-admin/ or /wp-login.php at the end of your domain name and there you go.
Therefore it’s crucial to give more protection to the WordPress login page, here are some recommendations to secure it:
Use Strong Usernames & Passwords
The most general WordPress hacking attempts to use stolen passwords. Well, check out SplashData’s 2017 yearly listing of the most popular passwords stolen throughout the year (sorted by popularity).
- 123456
- Password
- 12345678
- qwerty
- 12345
- 123456789
- letmein
- 1234567
- football
- iloveyou
That’s right! The most popular password is “123456”, followed by a staggering “password”.
If your password is something like “123456”, you are handing hackers the key to break your admin dashboard. Instead, use something that’s hard to guess like “GDpswd_&com<018”.
The main reason why beginners don’t like using strong passwords is that they’re hard to remember. The good thing is now you don’t need to remember passwords again. You can make use of a password manager.
LastPass is one of the easiest and simplest ways to manage your passwords. It’ll not only generate secure passwords for you but then store them inside a browser add-on, that will surely save you the hassle of having to remember them.

By default, WordPress initially create an administrative user by using “admin” as username. In case that username is still active in your website, change it ASAP to something safer.
Use Two-Factor Authentication
Presenting a two-factor authentication (2FA) module on your website login page is another good security measure. It provides added WordPress security by giving an additional layer a user has to pass to gain access to your website dashboard. One very generic two-factor authentication is the one-time password you get when trying to sign up for some services.
Employ one of these popular plugins Google Authenticator, Two-Factor Authentication, or Wordfence Security – you can perform two-factor authentication on your WordPress site so that even if a person has your username and password, they will likewise need your mobile device to log in to your WordPress dashboard.

Limit Number of Login Attempts
By default, WordPress allows users to attempt to log into the dashboard as many time as they want. This makes your WordPress site vulnerable to brute force attacks. Hackers try to crack passwords by trying to log in with various combinations.
This problem can be easily fixed by limiting the failed login attempts that a user can make by using the Wordfence Security plugin.
To do this, you can navigate to “Wordfence > All Options” then scroll down and find the “Brute Force Protection” section.

Use Your Email to Login
By default, you must input your username to log into WordPress dashboard. Using an email address instead of a username is the right and safer approach. The reasons are very clear. Usernames are likely to be easy to predict, while email addresses are not. Moreover, any WordPress user account is created with a unique email address that can be used as a valid identifier to log in.
You can use the Email Login plugin if you would like to use an email address instead of a username to log into your WordPress site.
Rename Your Login URL
By default, you can get to any WordPress page just by adding /wp-admin/ or /wp-login.php to the end of a domain name. This means that a hacker is likely to know exactly where to go to carry out attacks on your login page.
At this point, you have already restricted the user login attempts and exchanged usernames for email addresses. Now you can replace the login URL to your liking and get rid of 99% of direct brute force attacks.
This simple trick restricts an unauthorized entity to access the login page. Only someone with the precise URL can do it. To change your WordPress login URL I recommend utilizing the free WPS Hide Login plugin.
The plugin is simple and easy to configure since it only has one option. Once activated, you only need to change your WordPress login URL under the “Settings > General” section. Don’t forget to pick something truly unique that won’t already be on a list that a bot or script might attempt to scan.

Automatically Logout Idle Users
Logged in users can sometimes wander away from a screen for some reason, and this poses an unwanted security risk. For example, someone can hijack their session, replace passwords, or make changes to their account.
You can prevent this by making sure that your website will log people out after they have been idle for a certain period of time.
You can set this up by using Inactive Logout plugin. This plugin allows you to be able to set a customized time limit for idle users, after which time it runs out they will automatically be logged out.
To do this, go to “Settings > Inactive Logout” then simply set the timeout duration and message content to be shown when idle timeout screen shows. Don’t forget to click on the “Save Changes” button to store your settings.

back to menu ↑
Securing The Admin Dashboard
For a hacker, the most exciting part of a website is the admin dashboard, that is admittedly the most protected section of all. So, attacking the strongest part is a challenging challenge. If achieved, it gives the hacker a moral victory and the access to do a lot of damage.
Here’s what you can do to secure the admin dashboard of your WordPress site:
Protect The wp-admin Directory
The wp-admin directory functions as the heart of your WordPress site. Therefore, if this part of your website gets breached, then your entire website can get damaged.
One possible way to avoid this is to password-protect the wp-admin directory. With such a security measure, you might be able to access the dashboard by submitting two passwords. One functions to protect the login page, and the other functions to secure the WordPress admin area. If your website users are required to obtain access to some certain parts of the wp-admin, you can unblock those parts while locking the rest.
You can use the free WP htpasswd plugin to secure your admin area. It will automatically generate a .htpasswd file, encrypts the password with a specific algorithm and configures the right security-enhanced file permissions.

Use SSL to Encrypt Data
SSL (Secure Sockets Layer) is a technology that is used to encrypt the connection between your web server and your visitors browsers. Without that level of protection, your username and password are sent across the web as plain text. Thus implementing an SSL certificate is a smart step to secure the admin panel.
Today, getting an SSL certificate for your WordPress site is very simple. You can buy one through a third-party company or check to see if the hosting service company you are using provides one for free.
If you use SiteGround, you will be provided with a free Let’s Encrypt SSL certificate along with its hosting packages. I use it on almost all of my websites.

The SSL certificate also affects on your website’s Google rankings. Google tends to rank websites which have SSL higher than those without it. This means more traffic is coming. Now, who doesn’t want that?
Add User Accounts Carefully
If you are running a WordPress blog, or rather a multi-author blog, then you need to deal with many people accessing your admin panel. This quite able to make your website more vulnerable to security threats.
You can use the WordFence Security plugin if you want to ensure that any passwords users create are strong enough. This is only a precautionary measure, but it’s better than having several users who use weak passwords.
To perform this, you can navigate to “Wordfence > All Options” then scroll down and find “Brute Force Protection”. Everything you need is in the “Additional Options” section.

Change The Admin Username
During your WordPress installation process, you must never pick “admin” as the username for your primary administrator account. This easy-to-guess username can be approachable for hackers. All they need to find out is the password, then your whole website goes into the wrong hands.
Create a unique WordPress username for the new administrator account and then delete the “admin” user if there is one. This can be done by adding a new user under “Users” in the WordPress dashboard and assigning it as the ‘Administrator’ role.

After you assign the new account with an administrator role, you can go back and delete the original “admin” user. Ensure that when you click on the “Confirm Deletion” button, you choose the “Attribute all content to” option and select your new administrator profile. This will assign the new person as the author of those posts.

You can also rename your current “admin” username manually through phpMyAdmin in your web hosting with the following command. Be sure to back up your database before performing editing tables.
UPDATE wp_users SET user_login = 'newadminusername' WHERE user_login = 'admin';
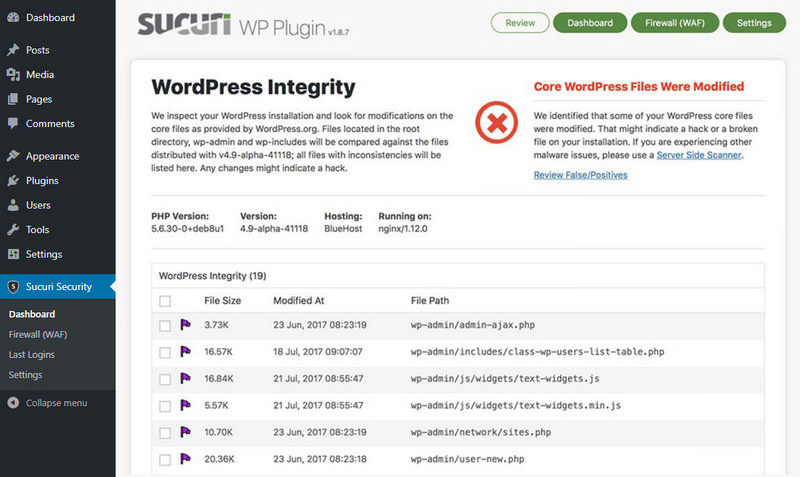
Monitor Your Files
When a hacker hacks your WordPress site, most likely one or more of your core files will be compromised with malicious code.
Compromised? Yes, with access gained to your website file system, hackers can change the contents of one or more files. Once they made it to this stage, they’ll have full access to your website and can surely perform whatever they want with it.
But this can be overcome by automatically monitoring your whole WordPress installation for unwanted file changes (even for file permissions change!) and soon notify you in the event of something happens through plugins such as Wordfence Security or Sucuri Security.
To perform files monitoring using Wordfence Security, you can go to “Wordfence > Scan” and then click the “Start New Scan” button.

If you are using Sucuri Security, just go to “Sucuri Security > Dashboard” and everything you’re looking for is there.
back to menu ↑
Securing WordPress Database
Another possible attack point that might be targeted is your database. If a hacker can gain control of your database, they can do a lot of damage. As an example, they can add a new admin user and password as they like and get unlimited access to your website dashboard.
Here are a few suggestions you can do to secure your database:
Set Strong Database Passwords
A strong password for the primary database user is a must because this password is the one used by WordPress to access the database.
As always, use a combination of uppercase, lowercase, numbers, and special characters for the password. Passphrases are also excellent. For this, I once again suggest LastPass for generating and storing the random password.
To change the database password, you need to log in to your web hosting cPanel. Once you logged in, go to “Databases > MySQL Databases” then locate the database user you want to change the password for, click the “Set Password” button to set a new password.

After you successfully change the password in your database, the next step is to replace the database password that is on your WordPress. To do this, follow these steps:
- Access your WordPress core files using Filezilla FTP client (preferably using a secure FTP connection).
- Look for the
wp-config.phpfile located in your WordPress base directory. Right-click and select “View/Edit” then locate the following line of code:define( 'DB_PASSWORD', 'yourpassword' );
- And change to:
define( 'DB_PASSWORD', 'yournewpassword');
- Save the file and upload it!
Use Different Database Users
If you are utilizing a single web hosting account for several WordPress sites, you need to refrain from using the same database user for all of them.
Actually, every WordPress site should have its own database plus each database should have different user and password. This way, when a hacker gets access to the login details for one database, the others would remain secure.
For a complete tutorial, you can read how to create databases and database users.
Change Database Table Prefix
WordPress by default uses wp- as the prefix for all tables in your WordPress database. In case your WordPress site is using the default database prefix, then it can make it easier for hackers to guess what the name of the table is in your database. Therefore I suggest you change it to something more unique.
To avoid such attacks is to change wp- to some other term. For example, you can change it to mywp- or wpnew-.
For a complete tutorial, you can read how to change WordPress database table prefix.
Note: This could potentially break your website if it’s not done correctly. Just proceed, if you honestly feel confident with your coding skills.
Make Backups Regularly
Regardless of how secure your WordPress site is, there is always room for enhancements. But in the end, keeping an off-site backup somewhere might be the best antidote no matter what happens.
If you have a backup, you can restore your WordPress site to a working state whenever you want. Free WordPress plugins like UpdraftPlus or BackWPup can be utilized to run regular backups of your website files and database to remote locations such as Amazon S3 and Google Drive.

If you would like a premium solution, then I highly recommend VaultPress or BackupBuddy, which are excellent. I have it set up so that it creates backups every week. And if anything bad happens, I can easily and quickly restore the website with just one click.

I know several larger websites run backups every hour, but for most organizations that is complete overkill. Not to mention, you would need to make sure that most of those backups are being deleted after a new one is created because each backup file takes up enough space on your drive. Therefore, I would recommend doing weekly or monthly backups for most organizations.
If a security breach occurs, even though your data has been successfully compromised, you can still first secure your website, and then fall back to your latest backup to get your website up and running again.
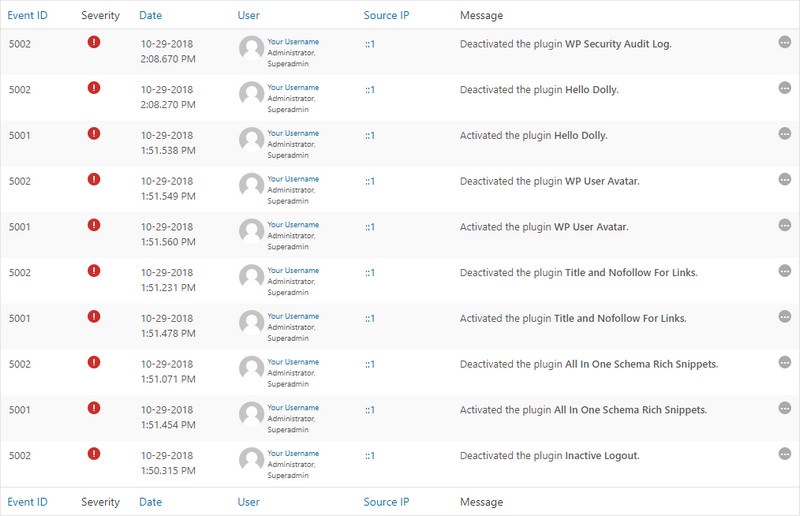
Monitor Your Audit Logs
When you’re running WordPress multisite or handling websites with multiple authors, it’s crucial to know what type of user activity is being carried out. Your writers and contributors might be changing passwords, but there might be other things that you don’t want to occur. As an example, changes to theme and widgets are clearly only reserved for the admins. When you check the audit log, you can ensure that your writers and contributors are not trying to change something on your website without consent.
WP Security Audit Log plugin provides a complete list for these activities, along with email notifications and reports. At its simplest, the audit log could help you to see that an author is having trouble logging in. But the plugin could also reveal malicious activities carried out by one of your users.
back to menu ↑
Securing WordPress Through Hosting
WPWhiteSecurity study shows that 41% of hacked WordPress sites were hacked through security vulnerability that exists on their hosting platform. This is far more than from other sources, including due to having a weak password.
Your host has a major role in whether your website will be hacked or not. So you need to implement the following steps to keep your website secure:
Use Managed WordPress Hosting
There are several companies that offering managed WordPress hosting and while you pay a premium for managed WordPress hosting in comparison to more traditional shared or unmanaged hosting, it’s worth it.
Therefore from the many web hosting service providers, I privately use and recommend SiteGround for your WordPress site hosting because they include a managed WordPress hosting on all plans.

Why You Should Choose SiteGround?
Their bread and butter are WordPress, a managed WordPress hosting is only devoted to WordPress and they handle all the WordPress technical aspects such as speed, website uptime, security, daily backups, scalability, WordPress updates and more.
Use Latest PHP Version
PHP is the main programming language used to build WordPress. It includes a runtime environment, and like any other piece of software, it has vulnerabilities and can be hacked. Newer versions of PHP are patched to fix security holes that existed in previous versions, and also to make it harder to write insecure code.
Updating to the latest version of PHP will also cause better performance, besides that some new plugins might not run on old versions of PHP. Hence, upgrading is undoubtedly a good thing that is needed.
For now, anyone running PHP versions below 5.6 no longer gets security support updates and are exposed to unpatched security vulnerabilities.
And guess what? Based on the official WordPress Stats page, as of writing this, more than 25% of WordPress users are still utilizing a version of PHP that is lower than 5.6. That is very horrible! Sometimes it takes time for businesses and developers to test and make sure compatibility with their code, but they don’t have any excuse to run on something without security support.
Don’t know which version of PHP you are currently using? Most web hosts usually include this in a header request on your website. A quick way to check is by analyzing your website through Pingdom. Click into the first request and then find the ‘X-Powered-By’ parameter. Generally, this will show the version of PHP used by your current web server.

If you use a WordPress host that has cPanel like SiteGround, you can easily switch among PHP versions just by clicking on “PHP Version Manager” under the “Software” section.

Harden The wp-config.php File
The wp-config.php file stores core information about your WordPress installation, and it’s the most crucial file in the root directory of your website. Thus protecting it is the same as securing the heart of your WordPress site.
This technique will make things difficult for hackers to breach the security of your website since they can’t get access to the wp-config.php file.
Move wp-config.php
To move your wp-config.php file, copy everything out from it to a different file. Then in your wp-config.php file, you can place the following code snippet to only include your other file.
<?php
include('/home/yourdomain/wp-config.php');
Note: The directory path may differ according to your web host and setup. Although usually, it’s just one directory above.
Update Security Keys
WordPress security keys are a set of random variables that serve to improve the encryption of information stored in a user’s cookies. There have been 4 different types of keys since WordPress 2.7: AUTH_KEY, SECURE_AUTH_KEY, LOGGED_IN_KEY, and NONCE_KEY. When you first install a WordPress, these are automatically generated randomly for you. But in case you have gone thru multiple migrations or bought a website from someone else, it might be better to create fresh WordPress keys.
Luckily WordPress has a free tool that can help you to generate new random keys. You can update your current keys located in your wp-config.php file.
/** MySQL hostname */
define('DB_HOST', 'localhost');

/** Database Charset to use in creating database tables. */
define('DB_CHARSET', 'utf8mb4');

/** The Database Collate type. Don't change this if in doubt. */
define('DB_COLLATE', '');

define('DISALLOW_FILE_EDIT', true);

/** Authentication Unique Keys and Salts. */
define('AUTH_KEY',         'xS3b|0_oIjaBw{b@t8_uCJvtX}+5x!8__be#wFn:KXq/W#2wXvh]Tt|-y?0Ru4Zb');
define('SECURE_AUTH_KEY',  'a]hy[=L>>J/q@|G93NlFK1eBxs$zSmV))c>icAS3+I`tW8;zI_)^K^R[tiVnkR9?');
define('LOGGED_IN_KEY',    '?I~vb$WB{`Ix:#2=/5&#ROg5}=R}{*6T_!~_%5@4*LA3r7ZHXlp?Mi7Zj_p0]KdY');
define('NONCE_KEY',        '2(FE^85M>Q-Si0snG?l5:Me52MFLy!~= lq46:C!?@?sOs?7jQr^|zG!HLe0:,;S');
define('AUTH_SALT',        'et[(=Vdk,aXT*1Y@5FD%)ov|[LzggbH?H<7-hgjg&P~Pn2iQ*C8xr)Y3ogq?{{E}');
define('SECURE_AUTH_SALT', 'U29(hvjoLK9n7c&w0Y4>@K%J?$#SZU/__^[a?6LjjJwT&2`>^gE.ud{IJk<[QC4*');
define('LOGGED_IN_SALT',   'a>GVm!8+iK9r=}3&D2gBSm:y(TWjp?$,za%7}3i+0uv,HOt73<puO2y9Y4Up8NRf');
define('NONCE_SALT',       'UwV [ad-1qXHL{Di.om!4UgW$uGPBlvFoHWgf=dd1daa-8F^kO_3`:bjmEmhY={1');

/** WordPress Database Table prefix. */
$table_prefix  = 'wp_';
Change Permissions
Regularly files permissions in the root directory of a WordPress site will be set to 644, which means that files are readable and writable by the owner of the file and readable by users in the group owner of that file and readable by everyone too. Based on the WordPress Codex, the right permissions for the wp-config.php file is to be set to 440 or 400 to prevent other users on the server from reading it. You can easily change this by using your FTP client.

Disable File Editing
WordPress has a built-in code editor that allows you to edit your theme and plugin files directly from your WordPress admin area. But if it falls into the wrong hands, this feature can be a horrible security risk.
Therefore, it can be advantageous to disable the ‘Appearance Editor’ on WordPress. Most of you might be there at one point or another. You go to the ‘Appearance Editor’ quickly to edit something and suddenly you are left with a white screen of death. It would be much better to edit the file locally and then upload it via FTP. And of course, in best practice, you should first do testing things like this on a development website.
Also, if your WordPress site is successfully hacked, the first thing they might try to do is edit a PHP file or theme through the ‘Appearance Editor’. For them, this is a shortcut to execute malicious code on your website. But if they don’t have any access to this code editor from the dashboard, then that can help prevent attacks.
You can easily do this by adding the following code to your wp-config.php file.
// Disallow file edit
define( 'DISALLOW_FILE_EDIT', true );
Always Use Secure Connections
When setting up your website, always connect the server only via SFTP or SSH. SFTP is preferred over the traditional FTP because it has better security features, of course, not attributed with FTP. This will make sure that the files you are transferring is correct and is not hijacked and altered by a hacker.
For details about how to use SFTP, you would need to contact your web host.
Use Correct File Permissions
Incorrect files and directory permissions can usually cause serious problems, notably if you are working in a shared hosting environment. In such a case, changing files and directory permissions can be a positive step to enhance website security at the hosting level.
As an example, wrong file permission such as 777 could allow a hacker to upload a file or modify an existing file.
To change your file permissions, you must log in to your cPanel, then go to “File Manager” and make changes that you think are necessary.
WordPress recommends using these correct permissions on your website:
- All directories should be 755 or 750
- All files should be 644 or 640
- wp-config.php file should be 600
If you need an extensive guide on how to set up the correct file permissions, check out this Changing File Permissions guide on WordPress.org.
For convenience, you can use a free plugin like iThemes Security to scan files and directory permissions on your WordPress site.

Prevent Directory Browsing with .htaccess
If you have a folder which doesn’t contain an index.html or index.php file on your website, what happens is that all the files in that directory will be shown on the screen when a visitor types a link to that folder.
As an instance, if you create a directory called “data”, you can easily see all the contents of that directory just by typing http://www.yourdomain.com/data/ in your browser. No need for a password or anything.
This behavior is used by hackers to find out if you have any files with known vulnerabilities so that they can take benefit of these files to gain access. Moreover, this can also be used by other people to steal your files, copy images, find out the structure in your directory, and other information.
To prevent this, you can add the following line of code to your .htaccess file:
Options All -Indexes
Disable XML-RPC
In recent years, more and more hackers have targeted XML-RPC for brute force attacks. As Sucuri mentioned, the hidden XML-RPC feature is that you can utilize the system.multicall method to execute multiple methods inside a single request. That’s very beneficial since it allows an application to be able to pass multiple commands in just one HTTP request. But what also happens is that hackers use it to launch malicious attacks.
XML-RPC was enabled by default for the first time since WordPress 3.5 as it can help to connect your WordPress site with web and mobile apps.
There are a few WordPress plugins like Jetpack that depend on XML-RPC to be able to work correctly, but a majority of people out there won’t need this and it can be worthwhile to disable access to it.
Still not sure whether XML-RPC is currently running on your website? Danilo Ercole from the Automattic team created a small tool called the XML-RPC Validator. You can run your WordPress site through that to analyze whether XML-RPC is enabled. In case it isn’t, you’ll see a failure message as shown in the screenshot below:

To completely disable XML-RPC, you can install the Disable XML-RPC plugin. And all you need to do is activate it.
While the above solution is ample for most people, but it might still be an intensive resource for websites that are getting attacked.
In those cases, you might prefer to disable all xmlrpc.php requests even before the request is passed onto WordPress.
To do this, just paste the following code snippet into your .htaccess file:
# Block WordPress xmlrpc.php requests
<Files xmlrpc.php>
order deny,allow
deny from all
allow from 123.123.123.123
</Files>
Block All Hotlinking
Let’s say you find an image online and would like to attach it on your website post. First of all, you need to ask permission or to pay for that image, if not, there’s a high chance it’s illegal to do so. But if you successfully get permission, you might directly pull the image’s URL and use that to place the image within your post. The main problem here is that your website displays the image, but another website’s server that hosts it.
From this perspective, you have no control whatsoever whether the image remains on the server or not. But it’s also important to be aware of the possibility that people do the same thing on your website.
If you’re trying to secure your WordPress site, hotlinking is essentially someone taking your image and stealing the bandwidth of your server to display the image on their own website. Ultimately this will lead to slower website loading speeds and the potential for higher server costs which is assuredly very detrimental to the website owner.
To prevent hotlinking, just add the following lines of code to your .htaccess file:
RewriteEngine on
RewriteCond %{HTTP_REFERER} !^$
RewriteCond %{HTTP_REFERER} !^http(s)?://(www\.)?yourdomain.com [NC]
RewriteRule \.(jpg|jpeg|png|gif)$ http://dropbox.com/hotlink-placeholder.jpg [NC,R,L]
Note: The second line functions to define the allowed referrer – the website that you allow to link to images directly should be your actual website. If you would like to allow more than one website, you can duplicate this line and replace the referrer.
Apart from using the manual method above, there is an easier and faster method that is by utilizing a free security plugin. The All In One WP Security plugin includes built-in tools for blocking all hotlinking.
To do this, you can go to “WP Security > Firewall > Prevent Hotlinks” and then check the “Prevent Image Hotlinking” option box to activate it.

Implement HTTP Security Headers
Another step you can take to harden your WordPress security is to employ HTTP security headers. These are regularly configured at the web server level and tell the browser how to behave when handling the content of your website.
Here are 6 HTTP security headers that you can apply on your website:
Content Security Policy (CSP)
CSP helps reduce XSS attacks by inserting the allowed sources of content such as styles, scripts, and images to a whitelist. A content security policy can help to prevent the browser from loading unwanted malicious assets.
Unfortunately, there isn’t one size that is fit for all approach to CSP’s. Before you create a CSP, all you need to do is evaluate the resources you’re actually loading. Once you’re sure you have a handle on how resources are loading, you can then set up a policy based on those requirements.
When you got your CSP is ready, you need to add it to your functions.php file like this:
header('Content-Security-Policy: default-src 'self' 'unsafe-inline' 'unsafe-eval' https: data:');
Note: This uses single quote marks, and you have to escape the single quote marks, or if not then a PHP parse error message will be shown. You can escape a character by adding a backslash before it.
Let’s break it down! This CSP allows all types of resources from the current domain, ‘self’. ‘Unsafe-inline’ indicates that inline style and script tags are allowed, ‘unsafe-eval’ means that unsafe dynamic code assessment such as JS is allowed, ‘https:’ and ‘data:’ denote that loading resources only through HTTPS and data scheme are allowed.
X-Frame-Options
This header functions to help prevent clickjacking by telling to a browser that it shouldn’t render the page in a frame (or an iframe or object).
Include it in your functions.php file like this:
header('X-Frame-Options: SAMEORIGIN');
X-XSS-Protection and X-Content-Type-Options
The X-XSS-Protection HTTP header aims to help reduce Cross-site scripting (XSS) attacks and X-Content-Type-Options by giving instructions to IE not to sniff mime types, preventing attacks related to mime-sniffing.
Include it in your functions.php file with the following code snippet:
header('X-XSS-Protection: 1; mode=block');
header('X-Content-Type-Options: nosniff');
HTTP Strict Transport Security (HSTS)
HSTS is a way for the server to tell the browser that the browser’s communication with the server should only be through HTTPS.
To apply it, add the following code snippet to your functions.php file:
header('Strict-Transport-Security:max-age=31536000; includeSubdomains; preload');
Implement Cookie with HTTPOnly & Secure Flag
This header will instruct the browser to trust the cookie only by the server and that cookie is accessible through secure SSL channels.
Add this lines of code to your functions.php file:
@ini_set('session.cookie_httponly', true);
@ini_set('session.cookie_secure', true);
@ini_set('session.use_only_cookies', true);
You should do testing to your HTTP security headers by going to securityheaders.com.
Another manual way for securing HTTP Headers is to add the following lines of code into your .htaccess file:
Header set Strict-Transport-Security "max-age=31536000; includeSubDomains"
Header set X-XSS-Protection "1; mode=block"
Header set X-Frame-Options "sameorigin"
Header set X-Content-Type-Options "nosniff"
Header set Content-Security-Policy "default-src 'self' 'unsafe-inline' 'unsafe-eval' https: data:";
Alternatively, you can use the free Security Headers plugin if you don’t want to implement them manually.
Protect & Against DDoS Attacks
DDoS is a type of DOS attack that uses multiple systems to target a single system causing a Denial of Service (DoS) attack. DDoS attacks are nothing new – according to Britannica, the first documented case came from the beginning of 2000. Unlike someone hacking your website, these kinds of attacks in most cases don’t harm your website but rather will cause your website down for several hours or days.
Perhaps you often hear that DDOS attacks usually only happen to large companies like GitHub or Target. They’re conducted by what many people refer to as cyber-terrorists, so the motive might be merely to wreak havoc.
So what can you do to protect yourself from it?
One of the best recommendations is to employ reputable third-party security services like Cloudflare or Sucuri. If you are running a business and need tighter security, it reasonable to invest in their premium plans.

Their advanced DDoS protection truly helps to reduce DDoS attacks of all forms and sizes including those that target the UDP and ICMP protocols, nor SYN/ACK, DNS amplification and Layer 7 attacks. Other advantages include putting you behind a proxy that can help to hide your origin IP address, even though it’s not bulletproof.
back to menu ↑
Securing WordPress Themes & Plugins
Securing your themes and plugins is very important to keeping the website remains secure. Since these have complete access to your WordPress files and database, if a hacker can get into any one of them, he will be able to gain complete access to your website.
Let’s find out how to secure your WordPress themes and plugins the right way:
Delete Unused Themes & Plugins
If there are themes and plugins installed on your WordPress site that you aren’t currently using, it’s better to delete them.

Each theme and plugin adds additional code to your WordPress site that might contain vulnerabilities that hackers can exploit. When you take action to delete those that are not in use, you effectively reduce a hacker’s ability to get access to your website.
Regularly Update Core, Themes & Plugins
Every good software product always gets support from its developers and updates now and then. One of the main reasons for software updates is to correct security loopholes in the previous versions. Thus, you can enhance security by regularly updating your WordPress core, themes, and plugins.
Not updating your themes and plugins can cause troubles. Numerous hackers depend on the mere fact that people can’t be bothered to update their plugins and themes. More often than not, those hackers exploit bugs that have fixed.
The good news is that WordPress automatically rolls out updates regularly for its users, so a notification will show on your dashboard that notifying you about updates and information on the fixes, you’ll also receive an email about the update.

As for the plugins, you should update it manually by going to “Plugins” in your dashboard. When a plugin has a newer version, it will notify you and provides a link to update now.

As a good alternative, you can choose for a managed WordPress hosting from SiteGround. Along with many other features and enhancements to your security, a quality-managed web host offers automatic updates for all elements of your WordPress site.
Download Themes & Plugins from Trusted Sites
Many premium themes and plugins have ripped versions that you can get to download for free on file-sharing websites.
If you decide to skip the usually low fees and prefer to get premium themes or plugins from those websites, you’ll probably end up paying by giving a hacker control of your website.
I highly suggest that you download your themes and plugins directly from WordPress since these are wholly screened before added to their database.
Pick a Secure WordPress Theme
Picking the right theme for your WordPress site is one of the most challenging and essential decisions you’ll have to make. However, even though you find a theme that’s stunning and offers all the advanced features you need, you still have to ensure it’s “safe” for you to use. If you could find a secure WordPress theme and that meets all your criteria, congratulations you’ve landed on a winner.
Building your WordPress site using a secure theme makes maintaining it not too stressful. You won’t need to worry as much about it being outdated and vulnerable, causing conflicts with your plugins, falling prey to malicious perpetrators, or outright breaking your website. Luckily, there are many excellent themes available that fit the bill, and I highly recommend that you pick a theme from StudioPress.

StudioPress induced by security expert and core WordPress developer Mark Jaquith to review, tweak their themes and make sure that the Genesis Framework is the most secure framework for WordPress.
Why You Should Choose StudioPress?
Remove Your WordPress Version Number
Did you know that WordPress injects a generator tag on every page it generates? This tag isn’t visible to the public since it’s hidden inside the <head> section of the HTML document. But it can be a potential clue for hackers – if they know surely which version of WordPress you are using, they can refine their attacks to target particular vulnerabilities.
You can easily hide your WordPress version number with almost all security plugins like Wordfence Security or Sucuri Security.

To approach manually (and to also remove the version number from RSS feeds), consider adding the following code snippet to your functions.php file:
function remove_wp_version() {
	return '';
}
add_filter( 'the_generator', 'remove_wp_version' );
back to menu ↑
Final Thoughts
As you can see there are many ways you can apply to harden your WordPress security. Like using strong passwords, keeping core and plugins up to date, and choosing a secure managed WordPress host are just a few that will keep your WordPress site up and running securely. For many of you, your WordPress site is both your business and income, so it’s important to spend time and apply some of the security best practices mentioned above, sooner rather than later.
What is your favorite WordPress security measure? What do you suggest doing to improve WordPress security? Tell us in the comments below!

- Readers Rating
- Rated 4.9 stars
4.9 / 5 ( Reviewers) - Spectacular
- Your Rating